Dec 3, 2012

It seems like it has been forever!

 I haven't posted anything in quite some time and that is all do to my computer's power cord finally crapping out on me and no longer charging. It was just getting super hot and smelling like burnt plastic. So at last it went into the garbage... How sad. Plus I just came back from Colorado in time to spend Thanksgiving with the love of my life!

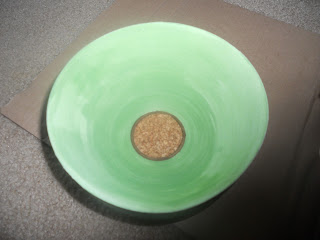
But now back to the crafts. I have managed to do some crafts in the midst of traveling back and forth from Colorado for work, Did I take pictures of my steps on all of them? probably not, I know one I did for sure and that is.....THE TICKET BOWL!!!!

The ticket bowl you ask? I was perusing good ol' Pinterest and Kyle said "ooo honey look at that one, it'd be perfect for Derek!" And low and behold it was a bowl made of raffle/carnival tickets. I clicked on it looked up how to do it and thought we can totally do this it will be cheap with our homemade mod podge and the cork leftover from other projects all we need is to find a roll of tickets. How hard could that be?

Let me tell you it was all quite simple except finding a roll of tickets that wasn't $10 or ones that only had a star or a party hat on them. I went to office supplies stores, Target, and Party City and they all fit under that category. So what did I do. I went to Amazon and found some for $3 in his favorite color(GREEN) and what made it hilarious is it says "one drink." It's only funny b/c he is in that stage of his life where that's all you do...College aged hah! Of course it was one of those items where they will only ship it if you buy more stuff b/c it is selling for so cheap, but that gave me a great excuse to buy my other Christmas presents that I needed to anyways. 3 days later they were in my mail box and I went straight to work.

After that long introduction here is what you need to make it all happen:

  • Roll of carnival tickets(mine was 1000ct
  • mod podge (mine's homemade 50% elmers with 50% h2o)
  • foam brush
  • cork
  • scissors
  • pen
  • clear gloss spray paint
Alright first things first. Lay your roll of tickets on a piece of cork and trace the inside circle. Cut the circle out and place inside where you just traced from.


Next slowly and gently start pusing down on the center of the tickets and work your way out. (make sure that your words are right side up when you push down) This forms the tickets into a bowl shape. Depending on the size roll you have will deteremine the size bowl. I'd say mine is pretty medium size.

When you have it as pushed out as it will go...I left the top of mine kinda thick so I had like a lip/collar around it... Take the mod podge and put it on the outside and inside as well as the on the cork. Make sure to get in all the cracks and let it dry.


Once it has dried do another layer and dry again. Then go to a well ventilated place and spray that sucker with the spray paint. This gives it a nice glossy finish and helps it be water proof and not fade in the sun. OR so I am hoping.


This is just supposed to be a bowl where he can drop his keys and his wallet in  after work or shoot maybe put a snack in it if he wants to. But I wouldn't recommend doing cereal or ice cream. Hopefully he likes it. If not oh well I only spent like $4 on it. Does that make me awful?!

I'll put the pictures up as soon as I get them onto this computer...I am using the boyfriends work laptop to post this, I felt bad that I hadn't in a while. Look for more blogs to come too... I have been busy busy doing more Christmas crafts/gifts as well!

Hope you all are having fun getting in the spirit of things!

See you next time Goonies! :D


Aug 10, 2012

Eiffel Tower Cake

Back in April when I made Derek's lego cake, his mom asked me to make her an Eiffel tower cake. Her one request on it was that it had to be a tiramisu cake. Which of course I had never made nor eaten so I had to look up a recipe and thank goodness for Betty Crocker's website. http://www.bettycrocker.com/recipes/tiramisu-cake/228b26f8-b564-4fdc-8c2c-3f38c9fd3ae7 It had a wonderful recipe and even helped me nail down the design I wanted to do. I had thought of 4 ways to do the cake and I couldn't decide.

Option 1: stack layers of cake and carve it to the shape of the bottom tier of the tower and use foam and frosting to do the rest of the tower. then I would pipe on the design.

Option 2: make a sheet cake and cut out the Eiffel tower and frost the whole thing and again pipe on the design.

Option 3: make a pull apart cupcake cake in the shape of the Eiffel tower with piped icing.

Option 4: just make a 2 layer cake frosted with the Eiffel tower in chocolate on top.( I DID THIS ONE!)
 

Here's what ya need

The recipe for the cake is

  • 2 boxes of yellow cake
  • follow directions on box but bake at 350 for 30 mins in a greased pan with wax paper lining the bottom so the cake comes out easier.


Coffee Syrup:

  • 3/4 cup hot espresso or really strong coffee
  • 2 tablespoons cognac(i used brandy tasted amazing)
  • 2 tablespoons powdered sugar
  • mix together in small bowl and set aside


Filling/frosting:
  • 3 cups marscapone or 16oz softened cream cheese(i use cream cheese)
  • 1 1/2 cups powdered sugar
  • 2 tablespoons cognac/brandy
  • 3 teaspoons vanilla
  • 1 cup cold whipping cream that's been beat to have peaks


in large bowl beat cheese, sugar, brandy,and vanilla until smooth. gently fold in the whipping cream until well blended.


After the cake has cooled put the bottom layer on a cookies sheet with wax paper around the edges to not make a mess with the frosting.

Pour some of the syrup over the cake to soak in and be delicious.
Next do a layer of frosting and put the other layer of cake on top.
(now you can pour more syrup over but i didn't b/c I forgot.)
Frost all the edges and the top of the cake, doesn't need to be smooth, but it will drip a little so just take your time.

Now to garnish the cake I took some chocolate melts and put them in a ziploc bag and piped out an Eiffel tower  onto wax paper and stuck in the freezer. I later piped  "bon anniversaire Tammy" in chocolate as well.


Before I put that on the cake I shook cocoa powder over the entire cake. Then put on the Eiffel tower and then outlined the cake in dark chocolate covered coffee beans.

Here is the finished product.


 I loved the way it looked and it was definitely Tammy's style. I saved the rest of the syrup to take over to her house so we could drizzle it over the top of the cake when it was served and it was perfect. When she opened her eyes to see the cake she was in love with it. Her description was that it looked like a vintage postage stamp. And she made us save the tower so she could show it off, it took her some convincing to eat it b.c she thought it was so amazing and when she finally cut into it she almost died and said it was the best tiramisu she had ever eaten!

Job well done I think. Enjoy!


Jul 7, 2012

Been a while

WOW!!! It has been a long time since I have posted a blog. The reason being is I have been in CO for the past 2 months and got home just in time to go to the beach for the 4th of July.

My sister had her first baby and he is the most adorable little boy ever! He was the reason I have been in Colorado. Helping her out whenever she needs it and helping my mom out around the house and even working at my old job. 

It felt amazing to be at home and shoot my mom and I even did a craft but I didn't take any pictures but I can explain it to you. LOL 

Basically the craft was making a sign that looked old and weathered and hanging it somewhere in your house.

We took and old piece of fence that we had laying in our shed and cut it to about 2.5-3 feet long. It's a fence board that's like 5 inches wide. Then you take hammers and other tools to whack at it and make it distressed looking. 

Next take the acrylic craft paints and lightly paint just the front of the wood. the less perfect the paint job the better it looks. Let that dry.

While it dries go to your computer and pick a word or saying that you like and the font that you like. I did this in paint because after you chose the word, font, and size you are going to FLIP IT HORIZONTALLY! that way when you print it, it is backwards.

When your board is dry place your "backwards" word on the board and take a wet paintbrush and make the word wet. Not soaking but just enough. Take a sharpie cap and go over the letters in all directions. This is to insure the ink transfers.

Pull off the paper and you should see the word lightly on the board. If you like how it looks then just drill some holes in the corners and put some twine in it and hang, if not take some black acrylic paint and lightly paint in the words. If it gets to dark just sand it to lighten it up!

I wish I had a picture to show you, maybe I'll get my mom to send me one. but in the mean time here is the ladies blog that we got it from.(below pic) 

Here is the ladies signs! 


Apr 21, 2012

Mason Jars!

Lately I have become slightly obsessed with crafts dealing with mason jars. In fact for Christmas last year I made my boyfriend's mom a mason jar chandelier for outside parties that she can hang in her gazebo. I of course didn't take any pictures but it looked so good and she loved it. So for today's blog I made soap dispensers out of mason jars!!
There it is, my new project. I meant to sell these at the swap meet in Portland that I was at last week ad tons of people looked and loved them but just no one wanted to b/c their husbands kept dragging them away since it wasn't car parts lol so thankfully I have all of the women on Kyle's side of the family to give them to.

Here's what ya need:
    1. Mason jars- any size I used quart 
    2. soap pumps
    3. soap
    4. pebeo glass paint 
    5. pebeo thinner
    6. foam brush
    7. silicone
    8. clear nail polish
    9. ribbon
    10. card stock
    11. gold paint
    12. black fine tip marker
    13. wire
To get the purple look I went to Michael's and bought Pebeo glass paint. I bought the purple and you'll also need the paint thinner. This was over by  the stained glass section and there are TONS of colors just make sure its the GLASS not PORCELAIN one! Next you'll put a couple of drops of color in a cup and mix it with a few teaspoons of thinner. flip the jars upside down and with the foam brush make long smooth strokes all around the jar. try to avoid air bubbles and lines. Let dry for 24 hours then place in a coll oven on a pan(keep upside down) turn the oven on I don't remember the temp but it says on the color bottle and bake for 40 minutes. Turn the oven off but keep the jars in until the oven is cold. It will smell a little while it bakes so open a window or vent. VOILA!!!! colored jars. 

Alright next I went to the dollar store and bought four different kinds of hand soap and dumped them in the jars. When its empty you'll take the top of the soap bottles and cut it off so you have the threads. Then recycle the rest of it.

Take your lids and silicon the two pieces together put a little on both sides and smooth it out. Then drill a hole in the center of the lid and use tin snips to make it big enough for the threads to go through.

Put a little bit of clear nail polish on the cut metal to avoid rusting. 

 Next stick the threaded part of the bottle through the hole and silicon it in place.
Take the pump from the bottle and thread it into place.

Then screw the lid on to the jar and now you have your very own soap dispenser!!!

Time for the finishing touches! 
I took some white card stock and cut out this design and then took some gold acrylic paint I had laying around and painted a filigree on it and traced it with a black fine point sharpie.


On the back I wrote hand soap so people knew what kind was in. I then wrote the "flavor" of soap on the side with the filigree.
With the rest of the card stock I cut out a square and painted it all gold. I poked holes the top of both and ran gold wire though it.
I bought some cream colored ribbon at the dollar store and made a bow following the instructions on this website.
I then wrapped some of the ribbon around the jar hot gluing the eds together but not on the jars so they can be taken off. I took the wire that I put on the tags and wrapped it around the ribbon on the jar. 
Then I hot glued the bow on the ribbon where the two ends were glued together. 


And there ya have it, soap dispensers made from mason jars.

Apr 15, 2012

Birthday

My boyfriend and his brother love Legos, and for Christmas we bought his brother a Lego man flashlight so I thought it'd only be fitting to make him a Lego block cake. He loves lime green so I knew it had to be that color but how was I going to make it.
I love baking/cooking so I knew I could do it but besides making a cake and just serving it in a pan or watching Duff make cakes I had no real idea of what to do.This was my inspiration.


Now what I needed was:

  • 2 cake mixes plus ingredients for it
  • 2 things of vanilla frosting
  • blue and green Neon food coloring
  • cupcake pan
  • cake pan
  • knife
  • butter knife
  • writing icing
  • wax paper
  • TIME!!!!!
Follow the directions on the back of the box and bake your cake. 
With the other box of cake make cupcakes!!! YUM! 

Let it cool. Slide a knife around the edges of the cake and take a larger pan and put it on top of the cake pan. Flip it over and watch your cake slide out. If pieces stick don't freak out just pull em out and use a little frosting as the glue.

Next take the cake and cut it to size and layer the two pieces on top of each other with a small layer of frosting in the middle. Then slide your knife over the top making it level. My cake was super super moist(who's complaining?!) so i had to let it set over night to try and give it some stability.

Next you'll take your vanilla frosting and do a "crumb coating" over it. Basically thin out the frosting a bit and do a really light cover of the cake. You'll want to see the cake through it. Let it sit for a few hours up to 24hours. It needs to have dried so its got a "crust" on it.
 This step basically just traps all the crumbs and when you put you're final frosting coat on it will be smooth.

The tinting was super easy just empty the rest of the frosting into a bowl and follow the direction on the back of the food coloring box. It was like 50 drops of green and 4 drops of blue(REMEMBER I USED NEON, so if you try the same color make sure you get NEON!!)
Put some wax paper around the edges of the cake to keep the frosting off the plate. Now frost away! 

Set aside 6 cupcakes to use as the circles on top of the Lego.

Here's the cake all frosted
Take the cupcakes and cut off the round tops, try and get them all the same size.

Place them on the cake with the rough side down makes it easier to frost.Take your frosting and do the sides and then the tops.

now if you've ever seen a Lego you know the they have "Lego" written on the circles so I used a tube of writing icing (yes, I know the colors don't match but I liked how it looked)

Here's the finished product!!! When we took it over Derek was ecstatic and was super happy. I took the rest of the cupcakes and just frosted them green and wrote Lego on them as well just to fit the theme. 

This was a big hit and he has already asked for a red one next year and his mom asked if I could make her a Eiffel Tower cake for her birthday, so come August there may be a post for it! 


Apr 3, 2012

Leftovers

As promised here is the post I was telling you about with the scraps from the baby blankie.

I knew that with a new baby lots of spitting up and burping would be occurring and with those you need some burping towels! So I was thinking hmm whats absorbent and pocket friendly and reusable....DUH cloth diapers!!!

So i bought a 4 pack, oddly enough they were cheapest at Joann's. Who knew a fabric store even would carry them but when they are cheaper then Wally world and Target I am not going to judge.

I also bought a little iron on elephant for "Peanut" at Michael's since I had a gift card and made a monogram. I felt like giving her an assortment and just had fun with it. Now when you make these just be very careful when stitching because the needle may shred the diaper, thankfully I didn't have any problems with that but I could see how it would happen because it is that gauze-y material (if you have never felt or seen a cloth diaper before.)

Here's a closer look at 3 out of 4 of them. 2 of them were very similar. They both said "BABY" but one used the green polka dot fabric lining the sides, so I only took one picture of them.


I am so glad that she liked these. It was funny I got called and put on speaker phone to hear here open my gift and I didn't know how my mom had wrapped it so all I heard was "Oh my gosh she made these?! They are so adorable!" I wasn't quite sure what she had gotten to first and hearing the "oooos" and "awws" from the ladies I couldn't really hear, but then I heard the gasp and even louder "oooooos" and I knew she had found the blanket. I am really glad that she enjoyed it and being able to hear her surprise and love for them was the best thing that I could ask for!   

Love you Christy can't wait to see little Peanut!